
Saturday, December 09, 2023


Tuesday, May 22, 2018
Terra Avis ad Astra

I was given an Ostrich egg so that I could participate in Gecko Studio Gallery's The Work of the Eggs... Continued exhibition. Here is my finished object, a rocket egg that opens up to reveal our intrepid Ostrinaut inside.


And here is a video of it under construction, to the accompaniment of Steve Taylor and the Perfect Foil's song Moonshot.
Friday, February 23, 2018
making cardboard automata with school kids!
In my day job, I am a chaplain at a primary school in south-east Melbourne, and as such, I get to work with small groups of children who need a little bit of extra support, especially in the areas of socialising and self-confidence. I thought one way to help them would be to give them a creative project to work on. By building these small cardboard boxes, they could express themselves, solve problems and create something cool.
A lot of hot glue later, and these are the results! I helped them work things out, but all the ideas came from the kids, and I reckon that they all did fantastic jobs!
Saturday, February 17, 2018
House - Illustration Friday
This week's Illustration Friday topic is house, and it just so happens that in last couple of months I have illustrated some houses. And very different these houses are, even though they both can be seen to be typical of their neighbourhoods!
Firstly is a sketch of a Queenslander house, very common in Rockhampton where I used to live. Rocky is built right on the Tropic of Capricorn, and so the older housing is built to be cool in a hot and humid before the common use of air-conditioning. There is a lot of ventilation which stops heat build up in the house and allows flow through of breezes. Also they are built off the ground for a bit more cooling; an added benefit of this is that house built in flood prone areas, such as the lower lying parts of town, can cope pretty well with a couple of metres of muddy flood water.
Weatherboards and corrugated iron are the main building materials used. I lived in a house such as this when the major cyclone Marcia came through town, and though it rattled a creaked a lot it came through unscathed.

In January I went to Tasmania to participate in the annual 'Faith and the Arts' summer school, and I did this painting of the brick workers cottages in the shadow of the Western Tiers. Poatina is an old Hydro village, and was built in the late 50's to house the workers constructing the Hydroelectric power-station from the Great Lake up on the plateau above the town. A huge tunnel was bored through the rock and a pipeline came down the mountainside to the power station at the bottom. Poatina was to service this, but with automation, the town was virtually abandoned until taken over by Youth Work organisation Fusion Australia in 1995.
There is now an arts colony in the town, with artists of all sorts staying and passing through all the time. The arts centre features kilns for glass works of all kinds.
The housing is mid century brick veneer workers cottages, which don't have to cope with prolonged heat and humidity, but icy winds and occasional snow is a real possibility.

Thursday, January 25, 2018
what holds you back?
This is an assemblage I made during Faith and the Arts 2018 as a response to discussion about freedom, and the things that hold us back. What weighs you down? What keeps your walls up and stops you being free to be who you were meant to be?
Wednesday, January 03, 2018
playing with Sketchbook
I have had Autodesk Sketchbook on my laptop for a little while now, but the nib on my Active pen broke, and although I could finger paint on the touch-screen or use a stylus, I couldn't really use the program to its best capacity.
Finally, however, I did get a new pen. It took a few weeks longer than expected because I ordered an Active Stylus by mistake. the HP website was not very clear in helping decide what I needed, and the Stylus did not work at all with my computer. It's weird that the one company would sell two seemingly identical devices that use entirely incompatible technologies, and then not differentiate between the two on their website beyond calling one a stylus and one a pen. Even the specs given were virtually identical.
Anyway, I eventually got it sorted and got back to using my laptop for drawing, and here's what I came up with. Mostly I was playing around, and making things up as I go, but that's how you learn. A cartoon sketch, a drawing using photo reference, and a caricature-ish picture of a man on TV that was on as I was drawing.


Sunday, April 30, 2017
Shoe

Everywhere I go, I've got into the habit of taking photos of my feet. Occasionally I paint them too. Here are my feet, encased in shoes, on a worn patch of concrete in Tasmania, rendered on paper in Gouache. The painting measures 190x140mm.
Wednesday, March 15, 2017
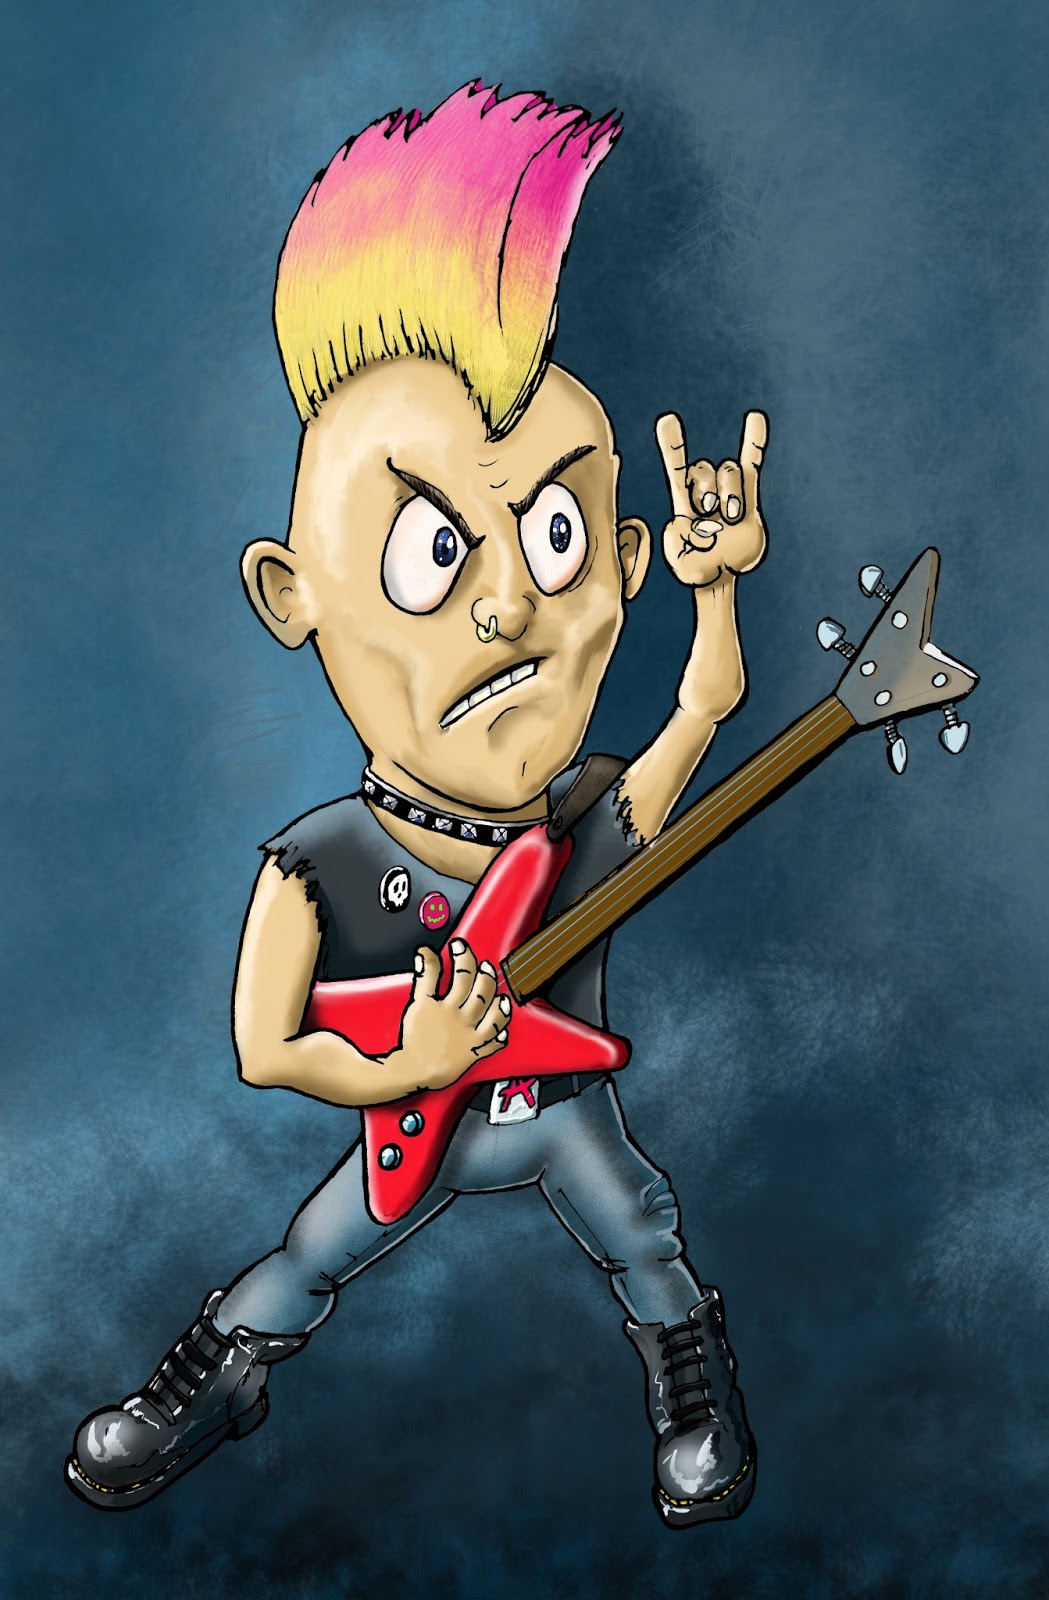
Punk
Illustration Friday says Illustrate a Punk. I did it twice, Here's one with markers,

And here's one done in Autodesk Sketchbook
Tuesday, March 07, 2017
Flying Kangaroo
I thought I would set myself a little challenge. Last week I had an idea for an animated sculpture that I would like to make one day - a flying kangaroo.
Regular readers of this irregular blog know that I have a fascination for automata - figurative kinetic sculptures. I have attempted a few myself in the last couple of years, most successfully my diesel-punk fish which picked up the Highly Commended prize at the 2016 Martin Hanson Awards held at the Gladstone Qld Art Gallery. And then it also won the Peoples' Choice prize, which was not just a certificate, but actual cash!
So late last week I spent time at our local Rockhampton zoo, sketching the kangaroos, who were very obliging. I then started to work out how to mechanized a roo.

After a few sketches I thought I would try a more finished illustration. I did an A4 pencil sketch, which I then inked and photographed.


Then, for variety, I did a da Vinci-Punk version. In a week or two, the Rockhampton Art Gallery is hosting a display of working models of some of Leonardo's greatest inventions. Our gallery is a little small for the whole collection, so the flying machines will be displayed at the airport, enticing visitors to see the rest in town. I loosely traced over the original lines digitally, used my new grunge brushes and imported an original da Vinci drawing for a bit of added texture.

Finally I took my original sketch and coloured it with markers. It was actually a lot quicker than doing it digitally (although I am still learning the program), but, of course, there is no undo in real life!
So now, when it comes time to build the model, I have a choice of doing a sleek composite metal Airbus Industrie kangaroo, or a wooden and fabric da Vinci-punk version. And I daresay there are other design options to explore. How would an Art Nouveau one look? Or Art Deco/streamlined 1930's industrial design version go? Or a completely natural version, with fur and feathers? The sky, I guess, is the limit.
Monday, February 27, 2017
new Blog title

Regular as clockwork, every 6 or 7 years, or there about, I update my blog header. I hope I'm not too hasty, some people don't cope well with change. But change happens, deal with it, dear reader! Let's see if this one stands the test of time.


Tuesday, February 14, 2017
Steam Punk

Steam Punk. It is an aesthetic that I quite enjoy, with all that brass and Victorian retro-ness. An alternative view of the late Industrial Revolution, with its Meccano Engineering and delicate Art Nouveau design. Pistons, tubing and Steam power, bring it on!
The one thing that annoys me a bit is the 'cogs on everything' idea.
I like cogs, they are a brilliant way of transferring, changing and modifying motion, but I don't like cogs that have no purpose. A cog has to DO something, even if that something is a mystery to the on-looker. A cog whose sole purpose is to sit there and look steam punky is a cog with no direction in life. That is a sad state of affairs. If you look inside and old clock (not a digital one) you will find a lot of cogs and gears, some spinning fast, others barely moving, but they all work together for the one goal, to provide an accurate measurement of time; nothing is superfluous, and everything works by clockwork.
I mean, a top hat with goggles is pretty cool, but a hat with goggles and gears, that's just a bit weird. Unless those gears and cogs add to the functionality of the hat, even if it's in a fairly obscure way, they really shouldn't be there. Ah, but it's decoration you say. Well, why not use a stylised bronze Art Nouveau Ostrich feather? Save the cogs on your hat for opening a flap on the top to deploy a hidden harpoon gun or some scientific apparatus! Cogs are functional. They are made to do something, let them do it!
Anyway, when I think of steampunk, I picture a bloke with a pink Mohican having a steaming cup of English Breakfast Tea, probably with a scone...
Illustration produced using Autodesk Sketchbook.
Friday, October 07, 2016
Fish on a Stick - Industrial Edition
How to make a Fish
Way back in 2006 I worked for a signage company that had a lot of very cool toys, big CNC routers, a laser cutter, a vinyl plotter or two and several engraving machines. So much potential for creative work! So much mundane stuff actually produced...
So I sometimes indulged my creativity with the odd lunchtime project. One of these was Fish on a Stick, which had a laser cut acrylic skeleton, a foam head, various plastic components and felt scales. He was a cartoony fish puppet and was a bit of fun to play with.

Fast forward 10 years. Since 2007 I have been doing youth work, and dabbling in creativity whenever the opportunity arose. In January 2016 I discovered the Laser Cutting company in the town where I now live. I looked through my old files and found I still had the program for laser cutting the fish. I decided it was time for an update! I cleaned up the Corel file and sent it off to be cut.

I was going for a used, worn look, with a bit of a transition between steam and dieselpunk, somewhere in there.


The laser cut plywood components. The original fish was made in plastics, but I wanted to use materials that were easier to work on at home.
Early assembly, showing the construction of the head.


The various fins were created with brass strips and pieces of fabric from an old tent, soaked in superglue.

The head section in the process of being painted. The foam was sealed with epoxy resin first, and then painted with acrylics,

I wasn't happy with the bumps in the surface, so they were filled and sanded back, leading to the patchy colouring, which looked pretty cool, but I ended up painting over that and adding a black paint wash and gold rub 'n' buff to create a metal effect.


The tail fins and the scales in place.


For display, I made a base which included vintage dials modified in Photoshop to display important readouts for Espieglerie Overflow and Aetheric Potentiality. I also prepared a dial for Bombacity Quotient but didn't use it.
The base became a sort of workhouse and a tiny worker is seen heading home after a long day working. So, is this a fish, or some sort of alternative reality airship? Possibly..
The mouth and flashing eyes can be operated by pulling a lever (a modified corkscrew) in the base.
I also made a pole which the fish sits on that you can walk around with. This lets you interact with people, with the fish in puppet mode. The tail swishes with a flick of the wrist and you can open the mouth and flash the eyes at will.
Check out the video too!
Monday, July 04, 2016
Don't Forget to Floss!


Here are two versions of my 'Don't Forget to Floss' design, the first one being a layered illustration on card and wood, the second one, an animated toy automaton made of wood. I hope to add a video soon!
Tuesday, March 15, 2016
Somewhere in the middle is reality

And there be dragons...
Of course, there are other days where all is sunshine and butterflies!
But what do these two states have in common? It is true that some days are better than others. There is a lot of suffering in the world and some people do have terrible lives while others seem to have it all.
But generally, the extremes are the stuff of fairytales (or nightmares), a fantasy.

The truth is, somewhere in the middle, is reality.
Monday, March 14, 2016

Thursday, February 18, 2016
Peg Whale - Craft activity

A little while ago I was asked to come up with some craft activities for a school holiday program for a bunch of pre-teens. I never tried Pinterest before, but I heard that it was a good place to look for such things.
And it was! One thing I saw there was a photo of a fish made around a wooden clothing peg that seemed ideal.

I have attached a pdf file of the shapes to cut out.
Print out the file on thin card.
Get out the colouring media of your choice - crayons, water colour, automotive spray paint, whatever... and design up your whale's skin. You can get creative with patterns or just go for a solid colour. My example was just quickly done with crayon, nothing special.
Carefully cut out the two shapes. With me so far?
Find a wooden peg. A fresh new one would be ideal! You could possibly use a plastic peg of this design, but you would need to research alternative adhesives. Better stick with wood if you can!

Fold on the dotted lines to create the lower jaw line of the Whale. I didn't do it on this sample, but you can colour both sides of this piece. Some kids draw teeth and a tongue for added effect.


Also, place a small amount of glue on the sides of the peg where the head attaches. I suggest you pour an adequate amount of glue onto a plastic plate and then apply what you need exactly where you need it using a thin strip of card.
Note how the back end of the head fits on the peg and that the front of the head lines up with the lower jaw.

And there it is, a whale, with an opening mouth! I quickly drew some eyes on my whale with a marker, but its much more fun to get some of those googly plastic eyes you get in craft stores and glue them on. See the picture at the top for examples by children at the holiday programme. This is a craft activity that appeals to boys as much as it does to girls, which is a good thing.


Included on the pdf is a tiny Jonah which can be coloured in (on both sides!) and then his arms and legs can be folded into a kneeling in prayer position. He is glued into position on the lower jaw and is revealed when the mouth is opened.
If you don't want to be so biblical, you can replace him with a tiny Pinnochio or a rolled up tongue or a fish or maybe some krill. Let me know how you get on with that!
Here is the pdf! https://drive.google.com/file/d/0Bwim6r-HwPXERDAzVmItQU1jMWs/view?usp=sharing
Subscribe to:
Posts (Atom)